

Power BI: Ultimate Solution to Parameters and Changing Data Sources
- Brent Jones

- Oct 31, 2018
- 4 min read

Changing a data source is done on the Power Query side of Power BI. This can be a bit of a hassle as you need to open up the Power Query editor and...
1. Find the query
2. Go to the "Source" step
3. Then finally change the source

Creating a Parameter
We can make this a bit easier by creating a parameter. This will allow us to simply select a data source from a pre-existing list directly - without having to go into Power Query.
1. Make the Parameter
To begin, click on the "New Parameter" button in Power Query:

A new window will pop up where you can create your parameter. For this example, my sources are different years of sales data.

You can choose a default value and a current value for the parameter. It's important to have a default value, because if a user ends up not choosing a value later on, Power Query will try to get data from a source that doesn't exist and subsequently fail.
2. Insert the Parameter in the Source
Next we need to change a bit of the Power Query 'M' code. Don't worry, it's simple! First, click on the "Source" step. You'll see the data source's full path being referenced in the code.

The parameter we just created will replace the last part of the path, in this case the "2015 Sales.xlsx" part. All we need to do is replace it with:
" & #"Data Sources"

If you name your parameter something else, you need to use that name. For example, of your parameter name is "SQL DB", you'll use:
" & #"SQL DB"
Hit enter and the query should refresh without any errors. If you do get an error, check to make sure the names you entered in your parameter list match exactly with the sources.
You're Done!
Now you can easily change the data source from the Power BI report window. Just click on "Edit Queries" -> "Edit Parameters":


Nice - good job!
Obviously, this technique is not limited to files with data by years. You could try it with locations, employee roles, product lines, etc.

"But Brent..." I can hear you begin to say. "I don't want to enter the names of the files. Isn't there another way to automate this?"
I hear you. Yes there is! Let's dig into it.
Creating a Dynamic List for the Parameter
We are going to use a bit of advanced M programming to here, but it's not hard at all. You can simply copy and paste for your project.
1. For Loop with Power Query
We'll be using a For Loop in the guise of List.Generate(). The concept is fairly straightforward as this function takes three parameters; 1) the starting number, 2) the ending number, and 3) the iterator. The syntax, however, may be a bit intimidating. If we want to go from 1 to 3, it would look like this:
List.Generate(() => 1, each _ <= 3, each _ +1)
In my example, I have years from 2015 to 2018. Putting that into our function, it'll be:
List.Generate(() => 2015, each _ <= 2018, each _ +1)
Okay, that's nice. Since humans are only 3 dimensional beings limited to traveling forward in time, 2018 will surely increase to 2019. Let's use a date function to grab the current date's year, then plug that into the equation.
To get today's date, it's: DateTime.LocalNow()
To extract a year from a date: Date.Year()
So we can combine those for today's year:
Date.Year(DateTime.LocalNow())
I'll create a variable called "currentYear" to hold this. I'll create one more to hold the beginning year of 2015.
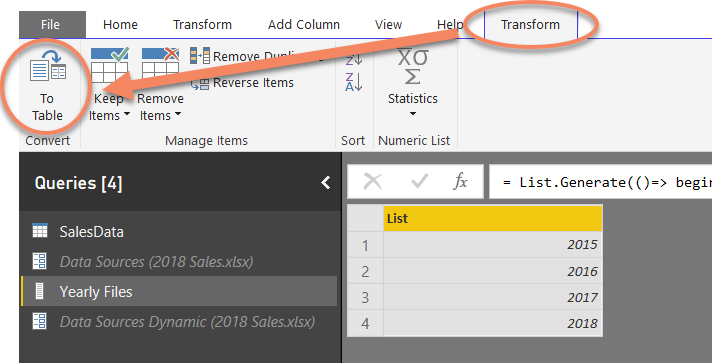
let beginningYear = 2015, currentYear = Date.Year(DateTime.LocalNow()), Source = List.Generate(()=> beginningYear, each _ <= currentYear, each _ + 1), in Source
This gives us a list of values to work with:

Check out the Microsoft documentation for more info on List.Generate().
2. Convert to Table
We have the list, but we want to end up with values like "2015 Sales.xlsx". Simple enough... all we need to do is concatenate two texts together. To do this, we first need to convert the list to a table.
After converting to a table, we can concatenate the two strings together to create our file name. You can use the "Custom Column" button to easily do this and use the function [Year] & " Sales.xlsx".

Remove the first column with just the years as we don't need it anymore. Finally convert the table back to a list with the "To List" button. We need to do this in order to use it for a parameter. I named this list, "Yearly Files", which ends up looking like this:

3. Make the Parameter
Now all we need to do is create the parameter like we did earlier. Except, instead of "List" choose "Query".

We can now replace our first parameter with this new one in the data source.

If you managed to follow along with me this whole way, you deserve the galactic Power BI warrior badge! Great Job! Let me know in the comments if you have any questions or want to share any other tips!


Comments